Adult Diaper Review and Testing Methods
Introduction
Perhaps the most common question asked by our customers is "which product is best?" When buying incontinence products it is often impossible to tell which products perform well, and which will not. Choosing the wrong product can mean wasted money, extra laundry, and embarrassment for the user.
To address the situation we have attempted to develop a testing methodology that can objectively describe how a product may perform in real-life use.
Our test procedure is broken into three stages and proceeds as follows:
Step 1: Dry Measurements
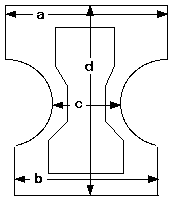
- The diaper to be tested is stretched flat and pinned to a solid surface.
- Measurements of the padding and backing dimensions are taken at four locations:
- A. Across the front wings
- B. Across the back wings
- C. Across the middle (crotch)
- D. From front to back (length)
- To simplify reporting, all measurements are rounded to the nearest 1/2"
- The thickness of the dry padding is measured at the thickest point using a dial caliper, and rounded to the nearest 1/10"
Step 2: Initial capacity testing
- The diaper is taped snugly around an 8" diameter round container. The container has a 1/8" opening in the bottom. The bottom of the container is also concave, so that the opening does not rest directly on the padding surface. This allows liquid to flow freely onto the padding.
- The leg openings are stretched flat at the lowest point and taped to the test surface. This allows observation of the test progress and determination of leakage. Leak guards, if any, are also taped flat.
- The hole in the bottom of the test container is plugged, and 64 ounces (1/2 gallon) of room-temperature tap water is added to the container.
- The plug is removed and the water flows thorough the hole and into the absorbent material.
- The plug is replaced when the first drop of liquid escapes from the padding and flows over the lowest point of the leg gathers.
- Time from step 4 to step 5 is recorded. This is the "Time to leak". Combined with the capacity, this provides an idea how quickly the diaper can absorb wetness.
- The diaper is removed from the container and set aside. The water remaining in the container is poured out and measured to the nearest ounce. Subtracting this from the original 64 ounces yields the "Initial capacity".
- The diaper is allowed to "rest" for 5 minutes. At this point the distance the wetness has spread from front to back is measured. This is the "Distribution". This indicates how well the diaper is able to spread wetness and make the most use of available padding.
- The diaper is then placed face-down on a solid surface. A 8x12" plate is pressed into the center of the diaper with a force of 150lbs for 10 seconds. The amount of liquid released is measured.
Step 3: Rewet testing and wet measurements
- The diaper is taped back on the test container and steps 3, 5, 6 and 8 are repeated. This gives the "Rewet capacity" and press-out.
- Finally, the padding thickness is measured again at the thickest point, to give the "Wet padding thickness".
Go to the test results.
© 2003 - All Rights Reserved
XP Medical is a division of XP Enterprises LLC
©2005 Incontinence Support Center